Vue Router

Vue Router

任何组件内通过 this.$router 访问路由器,可以通过 this.$route 访问当前路由

回退

1
2
3
goBack() {
window.history.length > 1 ? this.$router.go(-1) : this.$router.push('/')
}

动态路由匹配

1
2
3
4
5
6
7
8
9
10
11
12
13
const router = new VueRouter({
routes: [
// 动态路径参数 以冒号开头
{ path: '/user/:id', component: User }
{ path: '/user/:username/post/:post_id', component: User }
]
})

// 接受参数
const User = {
template: '<div>User {{ $route.params.id }}</div>'
}
this.$route.params.id
当使用路由参数时,例如从 /user/foo 导航到 /user/bar,原来的组件实例会被复用。因为两个路由都渲染同个组件,比起销毁再创建,复用则显得更加高效。不过,这也意味着组件的生命周期钩子不会再被调用。
1
2
3
4
5
6
7
8
9
10
watch: {
$route(to, from) {
// 对路由变化作出响应...
}
// 导航守卫
beforeRouteUpdate (to, from, next) {
// react to route changes...
// don't forget to call next()
}
}

捕获所有路由

1
2
3
4
5
6
7
8
{
// 会匹配所有路径
path: '*'
}
{
// 会匹配以 `/user-` 开头的任意路径
path: '/user-*'
}

当使用一个通配符时,$route.params 内会自动添加一个名为 pathMatch 参数。它包含了 URL 通过通配符被匹配的部分:

1
2
3
4
5
6
// 给出一个路由 { path: '/user-*' }
this.$router.push('/user-admin')
this.$route.params.pathMatch // 'admin'
// 给出一个路由 { path: '*' }
this.$router.push('/non-existing')
this.$route.params.pathMatch // '/non-existing'

路由嵌套

1
2
3
4
5
6
7
8
9
10
11
12
13
14
15
16
17
18
19
20
21
22
23
24
25
26
27
28
29
30
31
32
33
34
35
36
37
<div id="app">
<router-view></router-view>
</div>

const User = {
template: `
<div class="user">
<h2>User {{ $route.params.id }}</h2>
<router-view></router-view>
</div>`
}

const router = new VueRouter({
routes: [
{ path: '/user/:id', component: User,
children: [
// 当 /user/:id 匹配成功,
// UserHome 会被渲染在 User 的 <router-view>
{ path: '', component: UserHome },

// ...其他子路由
{
// 当 /user/:id/profile 匹配成功,
// UserProfile 会被渲染在 User 的 <router-view>
path: 'profile',
component: UserProfile
},
{
// 当 /user/:id/posts 匹配成功
// UserPosts 会被渲染在 User 的 <router-view>
path: 'posts',
component: UserPosts
}
]
}
]
})

编程式的导航

声明式 编程式
router-link :to=”…” router.push(…)
1
2
3
4
5
6
7
8
9
10
11
12
13
// 字符串
router.push('home')
// 对象
router.push({ path: 'home' })
// 命名的路由
router.push({ name: 'user', params: { userId: '123' }})
// 带查询参数,变成 /register?plan=private
router.push({ path: 'register', query: { plan: 'private' }})
const userId = '123'
router.push({ name: 'user', params: { userId }}) // -> /user/123
router.push({ path: `/user/${userId}` }) // -> /user/123
// 这里的 params 不生效
router.push({ path: '/user', params: { userId }}) // -> /user

后退或前进

1
2
3
4
5
6
7
8
9
// 在浏览器记录中前进一步,等同于 history.forward()
router.go(1)
// 后退一步记录,等同于 history.back()
router.go(-1)
// 前进 3 步记录
router.go(3)
// 如果 history 记录不够用,那就默默地失败呗
router.go(-100)
router.go(100)

命名路由

1
2
3
4
5
6
7
8
9
10
11
12
13
const router = new VueRouter({
routes: [
{
path: '/user/:userId',
name: 'user',
component: User
}
]
})

<router-link :to="{ name: 'user', params: { userId: 123 }}">User</router-link>

router.push({ name: 'user', params: { userId: 123 }})

命名视图

1
2
3
4
5
6
<div>
<h1>User Settings</h1>
<NavBar/>
<router-view/>
<router-view name="helper"/>
</div>
1
2
3
4
5
6
7
8
9
10
11
12
13
14
15
{
path: '/settings',
// 你也可以在顶级路由就配置命名视图
component: UserSettings,
children: [{
path: 'emails',
component: UserEmailsSubscriptions
}, {
path: 'profile',
components: {
default: UserProfile,
helper: UserProfilePreview
}
}]
}

重定向和别名

1
2
3
4
5
6
7
8
9
10
11
12
13
14
15
16
17
18
19
20
21
22
23
24
25
26
const router = new VueRouter({
routes: [
{ path: '/a', redirect: '/b' }
]
})

const router = new VueRouter({
routes: [
{ path: '/a', redirect: { name: 'foo' }}
]
})

const router = new VueRouter({
routes: [
{ path: '/a', redirect: to => {
// 方法接收 目标路由 作为参数
// return 重定向的 字符串路径/路径对象
}}
]
})

const router = new VueRouter({
routes: [
{ path: '/a', component: A, alias: '/b' }
]
})

路由组件传参

1
2
3
4
5
6
7
8
9
10
11
12
13
14
15
16
17
18
19
20
21
22
23
24
25
26
27
28
  const User = {
template: '<div>User {{ $route.params.id }}</div>'
}

const router = new VueRouter({
routes: [
{ path: '/user/:id', component: User }
]
})

// 通过 props 解耦

const User = {
props: ['id'],
template: '<div>User {{ id }}</div>'
}
const router = new VueRouter({
routes: [
{ path: '/user/:id', component: User, props: true },

// 对于包含命名视图的路由,你必须分别为每个命名视图添加 `props` 选项:
{
path: '/user/:id',
components: { default: User, sidebar: Sidebar },
props: { default: true, sidebar: false }
}
]
})

Vue Router 传参

params 传值

1
2
3
4
5
6
7
8
9
10
11
12
13
14
15
16
17
const router = new VueRouter({
routes: [
// 动态路径参数 以冒号开头
{ path: '/user/:id', component: User, name:'user',}
]
})

// 传值
this.$router.push({
name:"'user'",//这个name就是你刚刚配置在router里边的name
params:{
userId:"10011"
}
})

// 取值
this.$route.params.userId

query 传值

1
2
3
4
5
6
<template>
<router-link
:to="{ path: '/log', query: { name1: 'haha', name2: 'enen' } }"
>
</router-link>
</tempalte>
1
2
3
4
5
6
7
8
9
10
11
//  传值
this.$router.push({
path:"/user",//这个path就是你在router/index.js里边配置的路径
query:{
userId:"10011"
}
})

// 取值
this.$router.currentRoute.query.userId
this.$route.query.userId

基础路径

1
2
3
4
5
6
7
8
9
10
//  base 基础路径
const router = new VueRouter({
mode: 'history', // 只有 history 模式下 base 才起作用
base: '/app', // 基础路径 默认为 /
routes: [
// 动态路径参数 以冒号开头
{ path: '/user/:id', component: User }
{ path: '/user/:username/post/:post_id', component: User }
]
})

hase 模式下 base 不起作用,可以用路由嵌套的方式加上前缀


相关资料

vue Router
vue $router 路由传参的4种方法详解
vue router跳转方法
vite —— 一种尤雨溪开发的新的、更快地 web 开发工具
vite

云开发 Serverless 从入门到实战

Serverless

指构建和运行不需要服务器管理的应用程序的概念。
Serverless 是 FaaS 和 BaaS 的结合。Serverless = FaaS + BaaS。

FaaS(Function as a Service) 就是一些运行函数的平台,比如阿里云的函数计算、AWS 的 Lambda 等。
BaaS(Backend as a Service)则是一些后端云服务,比如云数据库、对象存储、消息队列等。利用 BaaS,可以极大简化我们的应用开发难度。

Serverless 的主要特点有:

  • 事件驱动
  • 函数在 FaaS 平台中,需要通过一系列的事件来驱动函数执行。
  • 无状态
  • 因为每次函数执行,可能使用的都是不同的容器,无法进行内存或数据共享。如果要共享数据,则只能通过第三方服务,比如 Redis 等。
  • 无运维
  • 使用 Serverless 我们不需要关心服务器,不需要关心运维。这也是 Serverless 思想的核心。
  • 低成本
  • 使用 Serverless 成本很低,因为我们只需要为每次函数的运行付费。函数不运行,则不花钱,也不会浪费服务器资源

前端工程师基于 Serverless 去写后端,最好也需要具备一定的后端知识。涉及复杂的后端系统或者 Serverless 不适用的场景,还是需要后端开发,后端变得更靠后了。

Serverless 开发最佳实践

将业务逻辑和函数依赖的 FaaS(如函数计算) 和 BaaS (如云数据库)分离。

1
2
3
4
5
6
7
8
9
10
11
12
13
14
15
16
17
18
19
20
21
22
23
24
25
26
27
28
29
class Users {
constructor(db, mailer) {
this.db = db;
this.mailer = mailer;
}
save(email, callback) {
const user = {
email: email,
created_at: Date.now()
}
this.db.saveUser(user, function (err) {
if (err) {
callback(err);
} else {
this.mailer.sendWelcomeEmail(email);
callback();
}
});
}
}
module.exports = Users;

const db = require('db').connect();
const mailer = require('mailer');
const Users = require('users');
let users = new Users(db, mailer);
module.exports.saveUser = (event, context, callback) => {
users.save(event.email, callback);
};

将业务逻辑全都放在了 Users 这个类里面,Users 不依赖任何外部服务。

函数的性能

当驱动函数执行的事件到来的时候,首先需要下载代码,然后启动一个容器,在容器里面再启动一个运行环境,最后才是执行代码。前几步统称为冷启动(Cold Start)。传统的应用没有冷启动的过程。

当第一次请求(驱动函数执行的事件)来临,成功启动运行环境并执行函数之后,运行环境会保留一段时间,以便用于下一次函数执行。这样就能减少冷启动的次数,从而缩短函数运行时间。当请求达到一个运行环境的限制时,FaaS 平台会自动扩展下一个运行环境。

执行上下文重用

1
2
3
4
5
6
const mysql = require('mysql');
// 初始化数据库连接 const connection = mysql.createConnection({ /* ... */ });
connection.connect();
module.exports.saveUser = (event, context, callback) => {
connection.query('...');
};

这样就只有第一次运行环境启动的时候,才会初始化数据库连接。后续请求来临、执行函数的时候,就可以直接利用执行上下文中的 connection,从而提高后续高函数的性能。
大部分情况下,通过牺牲一个请求的性能,换取大部分请求的性能,是完全可以够接受的。

给函数预热

通过主动调用函数的方式,隔一段时间就冷启动一个运行环境,这样就能使得其他正常的请求都是热启动,从而避免冷启动时间对函数性能的影响。

需要注意:

  • 不要过于频繁调用函数,至少频率要大于 5 分钟
  • 直接调用函数,而不是通过网关等间接调用
  • 创建专门处理这种预热调用的函数,而不是正常业务函数

如果你的业务允许“牺牲第一个请求的性能换取大部分性能”,那也完全不必使用该方案,

阅读更多

你的第一本Python基础入门书

Python

Python 优势

  • 上手容易、代码量更少、高效开发
  • 生态丰富、第三方库众多

语言核心特性

  • 数据类型
  • 数值运算和比较
  • 变量定义、赋值
  • 数组、字符串
  • 分支跳转
  • 循环
  • 函数

语言扩展特性

  • 异常机制
  • 模块与包
  • 内置数据结构
  • 内置函数
  • 迭代器
  • 生成器
  • 装饰器
  • 函数式特性
  • 动态类型
  • 以及其它常用语言特性

语言周边知识和功能

  • 标准库
  • IO 操作
  • 进程线程
  • 序列化
  • 代码规范
  • 以及运行环境相关,如 Python 解释器、虚拟环境,Java 的 JVM 等

扩展

为什么需要程序语言

计算机实际运行的是计算机指令序列。指令序列的直接表现形式是一连串的 0 和 1,也就是机器码。
用机器码的 0 和 1 这两个字符来编程是困难和低效的。为了提高生产效率,我们需要一种容易书写和阅读的标记来表达机器码指令。使用方式是用这种标记进行程序编码,编码完成后再将这些标记翻译为机器码。最初达到这个目的的是汇编语言,汇编语言一种是程序语言,不过是低级程序语言,它和机器码之间有着比较直接的一一对应关系。
扩展:计算机的世界里「抽象」这次词表示屏蔽掉内部纷繁复杂的细节,直接触达其核心功能,为外部建立起更高效更易用的使用入口和操作方法。

  • C 语言有非常高的执行效率,和马马虎虎的开发效率,在一些极度依赖执行效率和底层控制的领域独占鳌头,比如操作系统开发。
  • Java 借助于 JVM 得以跨越不同的操作系统和计算机架构而运行 Java 程序。Java 也拥有良好的执行效率和稳定性,它的执行效率与 C 语言相比,最高能保持在同一个数量级上。
  • Python 与 C 和 Java 相比有较大的不同,Python 是解释型语言,没有显式编译的过程,代码可直接由解释器解释执行,同时借助于解释器,其代码也可以跨平台运行。另一方面它是动态语言,在一定程度上更加灵活。Python 的理念是优雅和简单,虽然执行效率相较于 C 和 Java 大约慢一到两个数量级,不过 Python 的开发效率却数倍高于它们。

JavaScript中设计模式 从入门到实践应用

原生小程序中没有状态管理,看别人写状态管理需要观察者模式便来补一下。vue 中也使用了观察者模式,vue2 中用的 Object ……get、set 实现的。

构造器模式

用于在为其分配了内存后初始化新创建的对象。

1
2
3
4
5
6
7
function Car(model, year, miles) {
this.model = model;
this.year = year;
this.miles = miles;
}
// Usage:
var bmw = new Car('M4', '2019', '1000');

moModuleattern

  • 对象文字符号
  • 模块模式
  • AMD模块
  • CommonJS模块
  • ECMAScript Harmony模块
1
2
3
4
5
6
var newObject = {
variableKey:variableValue,
functionKey:function(){
//…
}
};

模块模式:

1
2
3
4
5
6
7
8
9
10
11
12
13
14
var testModule = (function() {
var counter = 0;
return {
incrementCounter: function() {
return ++counter;
},
resetCounter: function() {
counter = 0;
}
};
})();
// Usage:
testModule.incrementCounter();
testModule.resetCounter();

显示模块模式

当我们要从另一个对象调用一个公共方法或访问公共变量时,避免重复主对象的名称

1
2
3
4
5
6
7
8
9
10
11
12
13
14
15
16
17
18
19
20
var myRevealingModule = (function() {
var privateVariable = 'not okay',
publicVariable = 'okay';
function privateFun() {
return privateVariable;
}
function publicSetName(strName) {
privateVariable = strName;
}
function publicGetName() {
privateFun();
}
return {
setName: publicSetName,
message: publicVariable,
getName: publicGetName
};
})();
//Usage:
myRevealingModule.setName('Marvin King');

单例模式

1
2
3
4
5
6
7
8
9
10
11
12
13
14
15
16
17
18
19
20
21
22
23
24
25
26
27
28
29
30
31
32
var singletonPattern = (function() {
var instance;
function init() {
// Singleton
function privateMethod() {
console.log('privateMethod');
}
var privateVariable = 'this is private variable';
var privateRandomNumber = Math.random();
return {
publicMethod: function() {
console.log('publicMethod');
},
publicProperty: 'this is public property',
getRandomNumber: function() {
return privateRandomNumber;
}
};
}
return {
// Get the singleton instance if one exists
// or create if it doesn't
getInstance: function() {
if (!instance) {
instance = init();
}
return instance;
}
};
})();
// Usage:
var single = singletonPattern.getInstance();

观察者模式/发布-订阅模式

当对象间存在一对多关系时,则使用观察者模式(Observer Pattern)。比如,当一个对象被修改时,则会自动通知依赖它的对象。观察者模式属于行为型模式。

1
2
3
4
5
6
7
8
9
10
11
12
13
14
15
16
17
18
function ObserverList() {
this.observerList = [];
}
ObserverList.prototype.Add = function(obj) {
return this.observerList.push(obj);
};
ObserverList.prototype.Empty = function() {
this.observerList = [];
};
ObserverList.prototype.Count = function() {
return this.observerList.length;
};
ObserverList.prototype.Get = function(index) {
if (index > -1 && index < this.observerList.length) {
return this.observerList[index];
}
};
//...

中介者模式

中介体模式通过确保组件而不是彼此明确引用来促进松散耦合。

1
2
3
4
5
6
7
8
9
10
11
12
13
14
15
16
17
18
19
20
21
22
23
24
25
26
27
28
29
30
31
var mediator = (function() {
var topics = {};
var subscribe = function(topic, fn) {
if (!topics[topic]) {
topics[topic] = [];
}
topics[topic].push({ context: this, callback: fn });
return this;
};
// publish/broadcast an event to the rest of the application
var publish = function(topic) {
var args;
if (!topics[topic]) {
return false;
}
args = Array.prototype.slice.call(arguments, 1);
for (var i = 0, l = topics[topic].length; i < l; i++) {
var subscription = topics[topic][i];
subscription.callback.apply(subscription.content, args);
}
return this;
};
return {
publish: publish,
subscribe: subscribe,
installTo: function(obj) {
obj.subscribe = subscribe;
obj.publish = publish;
}
};
})();
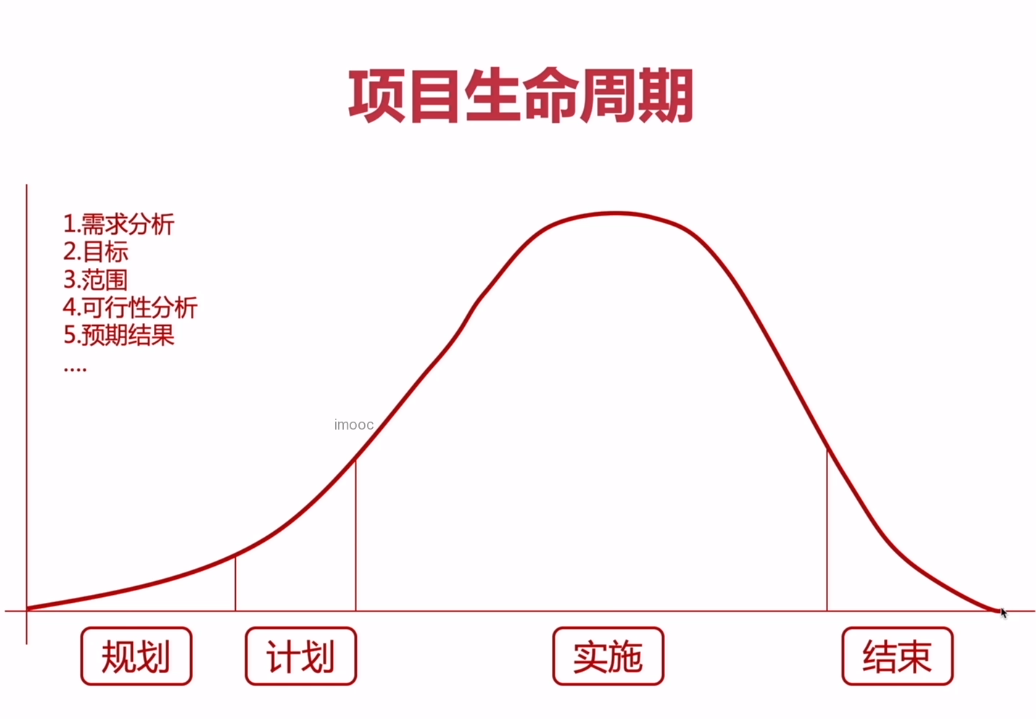
原型模式

1
2
3
4
5
6
7
8
9
10
11
12
var myCar = {
name: 'bmw',
drive: function() {
console.log('I am driving!');
},
panic: function() {
console.log('wait, how do you stop this thing?');
}
};
//Usages:
var yourCar = Object.create(myCar);
console.log(yourCar.name); //'bmw'

工厂模式

1
2
3
4
5
function Car(options) {
this.doors = options.doors || 4;
this.state = options.state || 'brand new';
this.color = options.color || 'silver';
}

Mixin模式

混合类是提供功能的类,这些功能可以由子类或子类组轻松继承以进行功能复用。

1
2
3
4
5
6
7
8
9
10
11
12
13
14
var Person = function(firstName, lastName) {
this.firstName = firstName;
this.lastName = lastName;
this.gender = 'male';
};
var clark = new Person('Clark', 'kent');

var Superhero = function(firstName, lastName, powers) {
Person.call(this.firstName, this.lastName);
this.powers = powers;
};
SuperHero.prototype = Object.create(Person.prototype);
var superman = new Superhero('Clark', 'Kent', ['flight', 'heat-vision']);
console.log(superman); //output personal attributes as well as power

装饰器模式

1
2
3
4
5
6
7
8
9
10
11
12
13
14
15
16
17
18
19
20
21
22
23
24
25
26
27
28
29
30
31
32
33
34
function MacBook() {
this.cost = function() {
return 997;
};
this.screenSize = function() {
return 11.6;
};
}
// Decorator 1
function Memory(macbook) {
var v = macbook.cost();
macbook.cost = function() {
return v + 75;
};
}
// Decorator 2
function Engraving(macbook) {
var v = macbook.cost();
macbook.cost = function() {
return v + 200;
};
}
// Decorator 3
function Insurance(macbook) {
var v = macbook.cost();
macbook.cost = function() {
return v + 250;
};
}
var mb = new MacBook();
Memory(mb);
Engraving(mb);
Insurance(mb);
mb.cost(); // 1522

10个每个开发人员都喜欢的JavaScript模式
菜鸟教程 观察者模式
JavaScript 设计模式与开发实践 第8章
不知道怎么封装代码?看看这几种设计模式吧!
JavaScript 设计模式学习总结与感悟

前端优化

资源

  • 资源压缩
    (去除无用代码、函数、资源压缩)
    (线上:极端压缩。debug模式:不压缩)

网路请求

  • 减少网络请求
    (资源合并例如:图片采用:tpg、webp、雪碧图、base64。html合并、js合并、css合并)
    (首屏加载、根据相关性加载)

  • 缓存
    (http cache、localstorage缓存、使用离线包)
    (高时效性页面:cgi、html合并。低时效性页面:缓存(离线包))


相关资料
多 “维” 优化——前端高并发策略的更深层思考
完整攻略!让你的网页加载时间降低到 1s 内!
解读新一代 Web 性能体验和质量指标

大前端试听课

大前端时代

20~40K 前端职位描述

与 UI 设计、产品经理、后端研发紧密合作,高效高质地完成页面的实现工作;
熟悉模块化、前端编译和构建工具,如 Yarn、Webpack 等;
对持续集成/持续交付有相关经验者优先;
协助 PM 完成完善产品需求,提供完善的技术实现方案;
理解 angularjs/vue 中任一框架背后的工作原理;
对前端工程化有一定的认识,熟练使用构建工具 Webpack/Gulp;
负责与后端进行接口的对接、联调,实现 Web 前端与后端服务器之间的数据上传与获取;
至少精通 Angluar、React、Vue 等其中的一种,熟悉 Webpack 等打包工具,精通 nodejs 尤佳;
了解常用数据库操作(如:Oracle、Mysql、Mongodb 等),具备 3 年以上的 Apache 或 Nginx 使用经验。

企业需要中高级前端

大前端时代新需求

  • 扎实的前端业务开发能力,交互理解
  • 多角色沟通协调能力
  • 多端、跨端的开发能力,新技术的学习能力

课程内容

  • 开发环境搭建
  • 工作中的痛点问题
  • DevOps 内容介绍
  • JS 框架选型
  • 前端工程化简介
  • 真机调试技巧
  • 缺陷控制
  • 什么是 Mock 数据
  • 登录鉴权

大前端
大前端

课程重点知识

  • 前端开发环境搭建
  • 六大常见场景教学
  • 自动化流程、多端跨端应用

软件项目开发

软件项目开发

项目生命周期

项目生命周期

项目定义阶段

  • 没有明确项目的目标、资源、工期
  • 没有进行合理的评估与预算
  • 客户沟通不及时、不充分、不具体

项目需求分析阶段

  • 详细的需求分析,项目预算
  • 资源计划与合理的分工
  • 客户沟通不及时、不充分、不具体

项目开发阶段

项目开发阶段

项目收尾

  • 没有规范的收尾流程,草草结束
  • 没有对文档进行归档,对项目进行总结,形成组织资产
  • 资源回收不及时,造成资源浪费

解决方案

  • 对组织人员培训,转变思维向自动化/规范化转型
  • 配合效率工具(自动化)对流程进行简化/标准化
  • 全员参与并实际
阅读更多
You need to set client_id and slot_id to show this AD unit. Please set it in _config.yml.