Node 概述
Node.js 是一个基于 Chrome V8 引擎的 JavaScript 运行环境。
Node.js 使用了一个事件驱动、非阻塞式 I/O 的模型,使其轻量又高效。
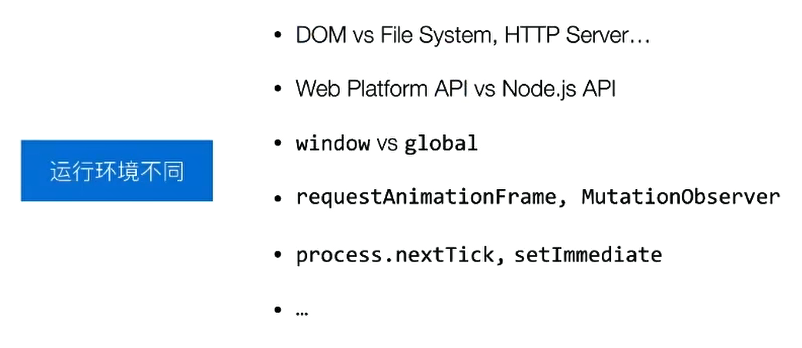
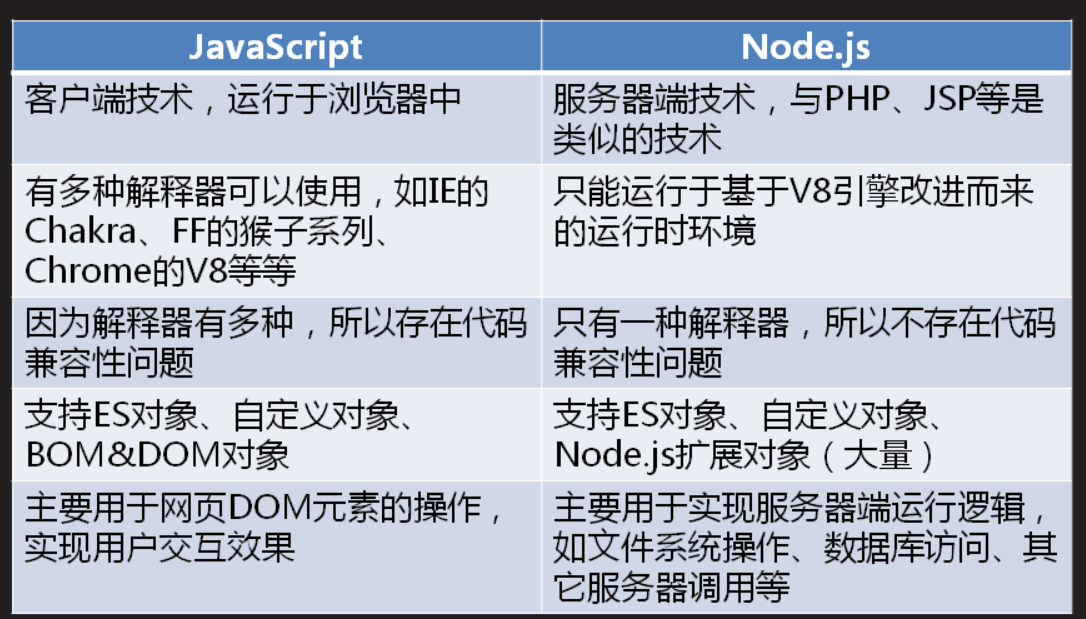
Node.js 和浏览器上 JS 的区别
Node.js VS 浏览器上的 JS
运行环境不同
API 不同
全局变量不同 window vs global
事件循环
Node.js 语法概述
Node.js语法是完全基于JavaScript的,下列内容与JS完全一样
- 数据类型
- 声明变量和常量
- 运算符
- 逻辑结构
- 函数作用域和闭包
- 对象和原型
- 对象分类
- JS和Node.js的最大不同点在由解释器所提供的扩展对象上!。
数据类型
- 原始类型:string、number、boolean、null、undefined
- 引用类型:ES核心对象:Global、String、Number、Boolean、Date、Math、Array、Error、Function、Object、RegExp
- Node.js对象:Buffer、ReadStream、ClientRequest
- 自定义对象
Node.js的特点
- 简单,避免过度设计
- 单线程逻辑处理
- 非阻塞的异步I/O处理
- 事件驱动编程
- 无锁机制,不会产生死锁
- 支持数万个并发链接
Node适用于IO密集型的应用,而不适合于CPU密集的应用。
Node全局对象
嵌入在浏览器中的V8引擎,支持ES原生对象、BOM和DOM对象,全局对象为window
Node中的全局对象是global,所有全局变量都是global对象的属性。
global
在交互模式下声明的全局变量和函数都是global对象的成员——全局对象污染
在脚本模式下声明的”全局变量和函数”不是global对象的成员——避免了全局对象污染
脚本模式下,每个.js文件都是一个独立的模块对象,其中创建的“全局变量和函数”都是该对象构造方法内的局部成员
process
当操作系统启动一个程序时,会将必须的可执行文件和数据文件从文件系统调入内存,分配必须的内存空间,执行其中的代码——称为创建了一个执行进程。
— 全局对象global.process就是这个进程的代码表示;
— process对象获取当前操作系统及运行时信息,并操作脚本所在执行进程。
Buffer
Buffer:缓冲区,专用于存储数据的内存区域,用于存储读写的文件数据、网络上要传输的数据等。
Buffer对象的实例,可以直接构建,也可以通过数据读写获得。
能存储字符数据,二进制的字节数据
1
| var buf1 = new Buffer.alloc(32);
|
将 Buffer 内容转换为特定编码的string
1
| console.log(buf3.toString('utf8'));
|
缓冲区:内存的一部分。在内存空间中预留了一定的存储空间,存储空间是用来缓冲输入或输出的数据。
缓冲区分为输入缓冲区和输出缓冲区。
高速设备与低速设备的不匹配,势必会让高速设备花时间等待低俗设备,可以在两者之间设立一个缓存区。
缓冲区的作用:
1.可以解除两者的制约关系,数据可以直接送往缓冲区,高速设备不用在等待低速设备,提高了计算机的效率。
2.可以减少数据的读写次数,如果每次数据只传输一点数据,就需要传送很多次,这样会浪费很多时间,因为开始读写与终止读写所需的时间很长,如果将数据送往缓冲区,待缓冲区满后再进行传送会大大减少读写次数,这样就可以节约很多时间。
缓冲区就是一块内存区,它用在输入输出设备和CPU之间,用来存储数据。它使得低速的输入输出设备和高速的CPU能够协调工作,避免低速的输入输出设备占用CPU,解放出CPU,使其能够高效率工作。
buffer偏重于写
cache偏重于读
全局函数
定时器
global.setTimeout():一次性定时器
global.setInterval():周期性定时器
process.nextTick():本次事件循环结束时立即执行的定时器
global.setImmediate():下次事件循环立即执行的定时器
模块
Node.js中每一个.js文件对应一个模块对象;
模块内声明的变量或函数的作用域是“模块作用域”——默认只能在当前JS文件(即当前模块)中使用,而不是全局作用域;
每个模块可以导出(exports)自己内部的成员提供其它模块使用,也可以引入(require)并使用其他模块中导出的成员;
Node.js启动时运行的第一个模块称为主模块(main module)
模块分类
核心模块
Node.js提供,被编译进二进制执行文件,可以被解释器直接使用,加载速度最快
第三方模块
基于node.js核心模块,第三方扩展应用模块
常用的第三方模块:express、less、webpack
自定义模块
文件式自定义模块
目录式自定义模块
Node.js 的安装运行
在官网上下载,安装点击下一步下一步即可完成安装。
检验是否安装成功,打开命令行窗口。
1
2
3
4
| node -v
v10.16.0
npm -v
6.13.7
|
以上显示为正常。
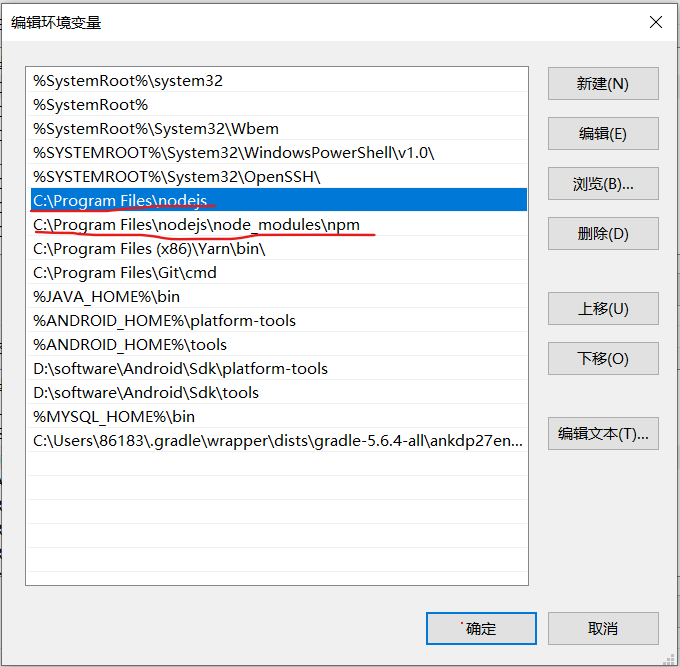
如果显示没该命令,
你可以尝试在系统变量的 Path 中找寻 node的路径如下图所示。
Node 的运行方式
可以在命令窗口中运行例如
编译模式
1
2
| node
console.log('Hello World')
|
1
| node -e "console.log('呵呵')";
|
也可以运行文件。
Node.js 最重要的几个概念
Node.js 模块
Node.js 包管理 NPM Yarn
Node.js 模块
1
2
3
4
5
6
7
8
9
10
11
12
13
14
15
16
17
18
19
20
|
const b = require('./b');
console.log(b);
var hello = require('./d');
var he = new hello();
he.setName('marico');
he.sayHello();
var he2 = new hello();
he2.setName('yfc');
he2.sayHello();
|
1
2
3
4
5
6
7
8
9
10
11
12
13
14
15
16
17
18
19
20
21
22
|
console.log(1);
module.exports = 'hello world'
function hello(){
var name;
this.setName = function(thyName){
name = thyName;
}
this.sayHello = function(){
console.log('hello' + name);
}
}
module.exports = hello;
|
Node.js 包管理 NPM Yarn
npm 常用来下载安装包
File system
读写文件
示例代码:
1
2
3
4
5
6
7
8
9
10
11
12
13
14
15
16
17
18
19
20
21
22
23
24
25
26
27
28
29
30
31
32
| const fs = require("fs");
const path = require("path");
// path.resolve(__dirname) 当前所在的目录
const data = new Uint8Array(Buffer.from("hello world"));
// writeFile 异步执行
fs.writeFile(path.resolve(__dirname, "hello.txt"), data, err => {
if (err) throw err;
console.log("文件已被保存");
});
// 同步
// fs.writeFileSync()
fs.readFile(path.resolve(__dirname, "hello.txt"), (err, data) => {
if (err) throw err;
// 二进制转成文字
console.log(data.toString());
});
// 捕获错误
try {
} catch (error) {}
// 捕获错误
process.on("uncaughtException", e => {
console.log(e.message);
});
|
HTTP
HTTP Server
示例代码:
1
2
3
4
5
6
7
8
9
10
11
12
13
14
15
16
17
18
19
20
21
22
23
24
25
26
27
28
29
30
31
32
33
34
35
36
37
38
39
40
41
42
43
44
45
46
47
48
49
50
51
52
53
54
55
56
57
58
59
60
61
62
63
64
65
66
67
68
69
70
71
72
73
74
75
76
77
78
79
80
| const http = require("http");
const net = require("net");
const { URL } = require("url");
const proxy = http.createServer((req, res) => {
console.log(req.headers);
res.writeHead(200, {
"Content-Type": "text/plain",
"x-myself-http-header": "max"
});
res.end("响应内容");
});
proxy.on("connect", (req, cltSocket, head) => {
const { port, hostname } = new URL(`http://${req.url}`);
const srvSocket = net.connect(port || 80, hostname, () => {
cltSocket.write(
"HTTP/1.1 200 Connection Established\r\n" +
"Proxy-agent: Node.js-Proxy\r\n" +
"\r\n"
);
srvSocket.write(head);
srvSocket.pipe(cltSocket);
cltSocket.pipe(srvSocket);
});
});
proxy.on("clientError", (err, socket) => {
socket.end("HTTP/1.1 400 Bad Request\r\n\r\n");
});
proxy.listen(1337, "127.0.0.1", () => {
const options = {
port: 1337,
host: "127.0.0.1",
method: "CONNECT",
path: "nodejs.cn:80"
};
const req = http.request(options);
req.end();
req.on("connect", (res, socket, head) => {
console.log("已连接");
socket.write(
"GET / HTTP/1.1\r\n" +
"Host: nodejs.cn:80\r\n" +
"Connection: close\r\n" +
"\r\n"
);
socket.on("data", chunk => {
console.log(chunk.toString());
});
socket.on("end", () => {
proxy.close();
});
});
});
|
Events 事件
1
2
3
4
5
6
7
8
9
10
11
| const EventEmitter = require('events');
class MyEmitter extends EventEmitter {}
const myEmitter = new MyEmitter();
myEmitter.on('event', () => {
console.log('an event occurred!');
});
myEmitter.emit('event');
|
爬虫
- 采用node,js中的 superagent+request + cheerio
- 使用Nightmare自动化测试工具。
1
2
3
4
5
6
7
8
9
10
11
12
13
14
15
16
17
18
19
20
21
22
23
24
25
|
app.get('/', function (req, res, next) {
superagent.get('https://cnodejs.org/')
.end(function (err, sres) {
if (err) {
return next(err);
}
var $ = cheerio.load(sres.text);
var items = [];
$('#topic_list .topic_title').each(function (idx, element) {
var $element = $(element);
items.push({
title: $element.attr('title'),
href: $element.attr('href')
});
});
res.send(items);
});
});
|
1
2
3
4
5
6
7
8
9
10
11
12
13
14
15
16
17
18
19
20
21
| const Nightmare = require("nightmare");
const nightmare = Nightmare({ show: true });
nightmare
.goto("https://www.baidu.com")
.type("#kw", "giscafer webgis入门实战")
.click("#su")
.wait(2000)
.evaluate(() => {
let text_list = [];
const nums_text = document.querySelectorAll(".c-container .t a");
nums_text.forEach((value) => {
text_list.push(value.textContent);
});
return text_list;
})
.end()
.then(console.log)
.catch((error) => {
console.error("Search failed:", error);
});
|
Koa2
基础篇
Koa2 源码解读
知识点
1
2
3
4
5
6
7
8
9
10
11
12
13
14
15
16
17
18
19
20
21
22
23
24
25
| const Koa = require('koa');
const app = new Koa();
app.use((ctx, next) => {
ctx.body = [
{
name: 'tom'
}
]
next()
})
app.use((ctx, next) => {
console.log('url' + ctx.url);
if (ctx.url === '/html') {
ctx.type = 'text/html;charset=utf-8'
ctx.body = `<b>我的名字是:${ctx.body[0].name}</b>`
}
}
app.listen(3000)
const router = {}
router['/html'] = ctx => {
ctx.type = 'text/html;charset=utf-8'
ctx.body = `<b>我的名字是:${ctx.body[0].name}</b>`
}
router[ctx.url](ctx)
|
常⻅见的中间件操作
- 静态服务
app.use(require(‘koa-static’)(__dirname + ‘/‘))
- 路路由
1
2
3
4
5
6
7
8
9
10
| const router = require('koa-router')();
router.get('/string', async (ctx, next) => {
ctx.body = 'koa2 string'
})
router.get('/json', async (ctx, next) => {
ctx.body = {
title: 'koa2 json'
}
})
app.use(router.routes())
|
1
2
3
4
5
6
7
| app.use(async (ctx,next) => {
const start = new Date().getTime()
console.log(`start: ${ctx.url}`);
await next();
const end = new Date().getTime()
console.log(`请求${ctx.url}, 耗时${parseInt(end-start)}ms`)
})
|
koa 原理
express
formidable:用于解析表单数据的模块,尤其是文件上传。
1
2
3
4
5
6
7
8
9
10
11
12
13
14
15
16
17
18
19
20
21
22
23
24
25
26
27
28
29
30
31
| const express = require('express');
const formidable = require('formidable');
const app = express();
app.get('/', (req, res) => {
res.send(`
<h2>With <code>"express"</code> npm package</h2>
<form action="/api/upload" enctype="multipart/form-data" method="post">
<div>Text field title: <input type="text" name="title" /></div>
<div>File: <input type="file" name="someExpressFiles" multiple="multiple" /></div>
<input type="submit" value="Upload" />
</form>
`);
});
app.post('/api/upload', (req, res, next) => {
const form = formidable({ multiples: true });
form.parse(req, (err, fields, files) => {
if (err) {
next(err);
return;
}
res.json({ fields, files });
});
});
app.listen(3000, () => {
console.log('Server listening on http://localhost:3000 ...');
});
|
body-parser:推荐写法
1
2
3
4
5
6
7
8
9
10
11
12
13
14
15
16
17
18
19
20
| var express = require('express')
var bodyParser = require('body-parser')
var app = express()
// create application/json parser
var jsonParser = bodyParser.json()
// create application/x-www-form-urlencoded parser
var urlencodedParser = bodyParser.urlencoded({ extended: false })
// POST /login gets urlencoded bodies
app.post('/login', urlencodedParser, function (req, res) {
res.send('welcome, ' + req.body.username)
})
// POST /api/users gets JSON bodies
app.post('/api/users', jsonParser, function (req, res) {
// create user in req.body
})
|
eggjs
框架介绍
Egg.js 是基于 Node.js 和 Koa 的一个企业级应用开发框架,可以帮助团队降低开发成本和维护成本。
eggjs 特性
- 提供基于 Egg 的定制上层框架的能力
- 高度可扩展的插件机制
- 内置多进程管理
- 基于 Koa 开发性能优异
- 框架稳定,测试覆盖率高
- 渐进式开发
搭建 eggjs
1
2
3
4
5
| mkdir egg-example && cd egg-example
// simple 模板
npm init egg --type=simple
npm i
npm run dev
|
目录介绍
- app 核心目录、业务逻辑、数据库操作
- config 针对插件配置
- test 单元测试
thinkjs
nestjs
工具
nvm:node 版本管理工具 ,之前的篇幅有详细介绍过安装以及应用
nvm-windows:Windows 的 node.js 版本管理
pm2:类似 windows 任务管理器
nodemon:检测目录文件更改重启应用
node-supervisor:检测文件重启应用
相关资料
[视频]Node.js 入门√
[视频]node.js 入门
Windows下安装及使用NVM√
windows上NVM安装与使用√
nvm 安装npm不成功,一直没反应√
node-lessons/lesson4 at master · alsotang/node-lessons · GitHub (fastgit.org)
Node.js 入门 - cnode
搭建 Node.js 环境 - 开发者实验室 - 腾讯云 (tencent.com)
基于 NodeJs 打造 Web 在线聊天室 - 开发者实验室 - 腾讯云 (tencent.com)
Linux 下部署 Express 环境 - 开发者实验室 - 腾讯云 (tencent.com)
Express 快速入门 - 开发者实验室 - 腾讯云 (tencent.com)
基于 CentOS 搭建 Koa2 框架 - 开发者实验室 - 腾讯云 (tencent.com)
Koa2 免费视频教程
Koa2+Vue2.x 实战电商系统
Nodejs 教程 Nodejs+Koa2 入门实战视频教程
Nodejs 教程 Koa 教程 Koa2 MongoDb 入门实战视频教程
Koa2 进阶学习笔记
Koa.js 设计模式-学习笔记
十个Node.js开发易犯错误之一:不使用开发工具
Egg.js 框架入门与实战
node实现爬虫的几种简易方式
使用 Nightmare 进行浏览器自动化测试
awesome-webgis
爬虫集合 InfoSpider
爬虫集合 awesome-spider
javascript standard style 一种 JavaScript 的代码风格
Uint8Array对象处理二进制数据
Buffer
自定义根证书颁发机构 CA 生成自签名证书
Redis + NodeJS 实现一个能处理海量数据的异步任务队列系统
Node 在有赞的实践 (youzan.com)√
《深入浅出Node.js》
《狼书》