P1 Android 开发概述和开发工具
Android 开发概述
Android 是一个开源的,基于Linux的移动设备操作系统,主要使用于移动设备,如智能手机和平板电脑。
Android 是由 Google 及其他公司带领的开放手机联盟开发的操作系统。
Android 编程是基于 Java 编程语言的,因此,如果你理解 Java 编程,这将利于你更好的学习 Android 应用程序开发。
Android官网
学习 Java
Android 开发是移动应用开发的表现形式之一。
Android、iOS、H5 App、Native + H5、RN、Ionic、MUI…
项目流程

Android 开发工具
- 下载安装 Java JDK
- 下载安装 Android Studio
P2 第一个 Android 应用
开始之前,您需要了解有关 Android 应用的两个基本概念:它们如何提供多个入口点,以及它们如何适应不同的设备。
- 应用提供多个入口点
Android 应用由各种可单独调用的组件构成。例如,Activity 是提供界面 (UI) 的一种应用组件。
“主”Activity 在用户点按您的应用图标时启动。您还可以将用户从其他位置(例如,从通知中,甚至从其他应用中)引导至某个 Activity。
- 应用可适应不同的设备
Android 允许您为不同的设备提供不同的资源。例如,您可以针对不同的屏幕尺寸创建不同的布局。系统会根据当前设备的屏幕尺寸确定要使用的布局。
如果应用的任何功能需要特定的硬件,如摄像头,您可以在运行时查询该设备是否具有该硬件,如果没有,则停用相应的功能。您可以指定应用需要特定的硬件,这样,Google Play 就不会允许在没有这些硬件的设备上安装应用。
1、在 Welcome to Android Studio 窗口中,点击 Start a new Android Studio project。

如果您已打开一个项目,请依次选择 File > New > New Project。
2、在 Choose your project 窗口中,选择 Empty Activity,然后点击 Next。
3、在 Configure your project 窗口中,完成以下操作:
- 在 Name 字段中输入“My First App”。
- 在 Package name 字段中输入“com.example.myfirstapp”。
- 如果您想将项目放在其他文件夹中,请更改其 Save 位置。
- 从 Language 下拉菜单中选择 Java 或 Kotlin。
- 选中 Use androidx.* artifacts 旁边的复选框。
- 其他选项保持原样。
了解一下最重要的文件。
首先,确保已打开 Project 窗口(依次选择 View > Tool Windows > Project),并从该窗口顶部的下拉列表中选择 Android 视图。随后,您可以看到以下文件:
app > java > com.example.myfirstapp > MainActivity
这是主 Activity。它是应用的入口点。当您构建和运行应用时,系统会启动此 Activity 的实例并加载其布局。
app > res
主要的资源文件
app > res > drawable
自定义的 XML 文件和图片
app > res > layout
布局文件
app > res > layout > activity_main.xml
此 XML 文件定义了 Activity 界面的布局。它包含一个 TextView 元素,其中具有“Hello, World!”文本
app > res > values
文字、颜色
app > manifests > AndroidManifest.xml
清单文件描述了应用的基本特性并定义了每个应用组件。
Gradle Scripts > build.gradle
有两个使用此名称的文件:一个针对项目“Project: My First App”,另一个针对应用模块“Module: app”。每个模块均有自己的 build.gradle 文件,但此项目当前仅有一个模块。
运行应用
在真实设备上运行
按照以下步骤设置设备:
1、使用一根 USB 数据线将设备连接到开发计算机。如果您是在 Windows 上开发的,则可能需要为设备安装合适的 USB 驱动程序。
2、执行以下步骤,在开发者选项窗口中启用 USB 调试:
- 打开设置应用。
- 如果设备使用 Android v8.0 或更高版本,请选择系统。否则,请继续执行下一步
- 滚动到底部,然后选择关于手机。
- 滚动到底部,然后点按版本号七次。
- 回上一屏幕,滚动到底部,然后点按开发者选项。
- 在开发者选项窗口中,向下滚动以查找并启用 USB 调试。
注意 是版本号 不是 Android版本。
按照以下步骤操作,在设备上运行应用:
1、在 Android Studio 中,从工具栏中的运行/调试配置下拉菜单中选择您的应用。
2、在工具栏中,从目标设备下拉菜单中选择要用来运行应用的设备。
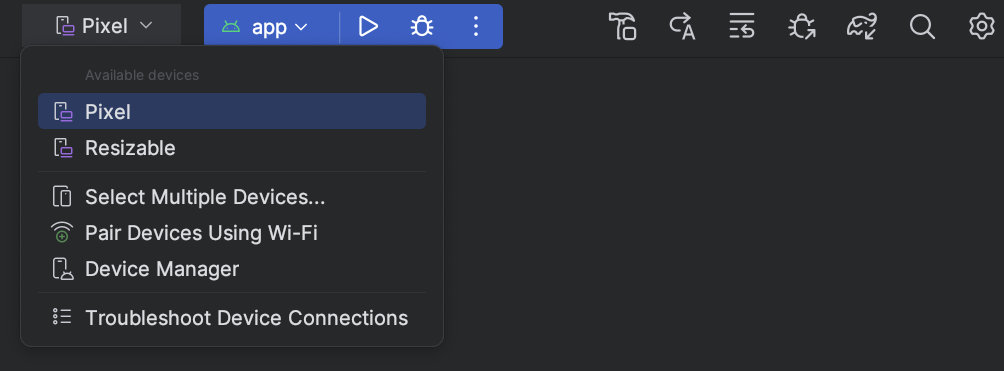
点击 Run 
Android Studio 会在连接的设备上安装您的应用并启动它。您现在会看到设备上的应用中显示了“Hello, World!”。
在模拟器上运行
按照以下步骤操作,在模拟器上运行应用:
1、在 Android Studio 中创建一个 Android 虚拟设备 (AVD),模拟器可以使用它安装和运行您的应用。
2、在工具栏中,从运行/调试配置下拉菜单中选择您的应用。
3、从目标设备下拉菜单中,选择要用来运行应用的 AVD。
点击 Run
Android Studio 会在 AVD 上安装应用并启动模拟器。您现在会看到应用中显示了“Hello, World!”。
在夜深模拟器上运行
1、启动 Android Studio
2、启动夜深模拟器,设置为 “手机版”,保存后立即重启。
3、链接夜深模拟器
CMD 打开命令窗口
切换到夜深安装目录,例如:D:\Program Files\Nox\bin
执行命令连接模拟器 nox_adb.exe connect 127.0.0.1:62001
4、在 Android Studio 点击 run。
通过shift+F10可查看设备(手机/平板/模拟器)的连接情况
P3 线性布局 LinearLayout
单位
dp
在 Android 里通常使用 dp,Android 屏幕碎片化比较严重,所以使用 dp。dp 会根据屏幕分辨率适配。
sp
字体使用 sp
布局管理器
频繁使用的布局:
LinearLayout(线性布局)
RelativeLayout(相对布局)
LinearLayout
LinearLayout(线性布局)它在单列中水平排布或单列中垂直排列其他视图。
最常用属性
android:id
android:layout_width:宽度
android:layout_height:高度
android:background:背景颜色
android:layout_weight:对单个子视图进行设置,以指定线性布局如何在其中包含的视图之间划分剩余空间。
android:layout_margin:外边距
android:layout_padding:内边距
android:orientation:以指定子视图显示在行还是列中。
android:gravity:以指定行或列中所有子视图的水平和垂直对齐方式。
android:layout_weight:权重

以下代码段显示了如何在布局 XML 文件中包括线性布局:
1
2
3
4
5
6
7
8
9
10
11
12
| <LinearLayout xmlns:android="http://schemas.android.com/apk/res/android"
android:layout_width="match_parent"
android:layout_height="match_parent"
android:paddingLeft="16dp"
android:paddingRight="16dp"
android:orientation="horizontal"
android:gravity="center">
</LinearLayout>
|
示例:
1
2
3
4
5
6
7
8
9
10
11
12
13
14
15
16
17
18
19
20
21
22
23
| <LinearLayout xmlns:android="http://schemas.android.com/apk/res/android"
android:layout_width="match_parent"
android:layout_height="match_parent"
android:orientation="horizontal">
<LinearLayout
android:id="@+id/box"
android:layout_width="match_parent"
android:layout_height="match_parent"
android:background="#000"
android:orientation="vertical"
android:layout_marginLeft="10dp"
android:layout_marginRight="10dp">
<view
android:layout_width="match_parent"
android:layout_height="100dp" />
<view
android:layout_width="match_parent"
android:layout_height="100dp" />
</LinearLayout>
</LinearLayout>
|

LinearLayout orientation=”horizontal” 默认子视图以行显示。
orientation=”vertical” 以指定子视图以列显示。
layout_width=”match_parent” 继承父元素宽度
layout_width=”wrap_content” 根据内容
示例:gravity 用法
1
2
3
4
5
6
7
8
9
10
11
12
13
14
15
16
17
18
19
20
| <LinearLayout xmlns:android="http://schemas.android.com/apk/res/android"
android:layout_width="match_parent"
android:layout_height="match_parent"
android:orientation="horizontal">
<LinearLayout
android:id="@+id/box"
android:layout_width="match_parent"
android:layout_height="match_parent"
android:background="#000"
android:orientation="horizontal"
android:layout_marginLeft="10dp"
android:layout_marginRight="10dp"
android:gravity="center_horizontal">
<view
android:layout_width="100dp"
android:layout_height="100dp" />
</LinearLayout>
</LinearLayout>
|

示例:layout_weight 用法,等比分
1
2
3
4
5
6
7
8
9
10
11
12
13
14
15
16
17
18
19
20
21
22
23
24
25
26
27
28
29
| <LinearLayout xmlns:android="http://schemas.android.com/apk/res/android"
android:layout_width="match_parent"
android:layout_height="match_parent"
android:orientation="horizontal">
<LinearLayout
android:id="@+id/box"
android:layout_width="match_parent"
android:layout_height="match_parent"
android:orientation="horizontal"
android:layout_marginLeft="10dp"
android:layout_marginRight="10dp"
android:gravity="center_horizontal">
<TextView
android:layout_width="0dp"
android:layout_height="match_parent"
android:layout_weight="1"
android:background="#ADFF2F"
android:text="one"/>
<TextView
android:layout_width="0dp"
android:layout_height="match_parent"
android:layout_weight="1"
android:background="#DA70D6"
android:text="two"
/>
</LinearLayout>
</LinearLayout>
|

P4 相对布局 RelativeLayout
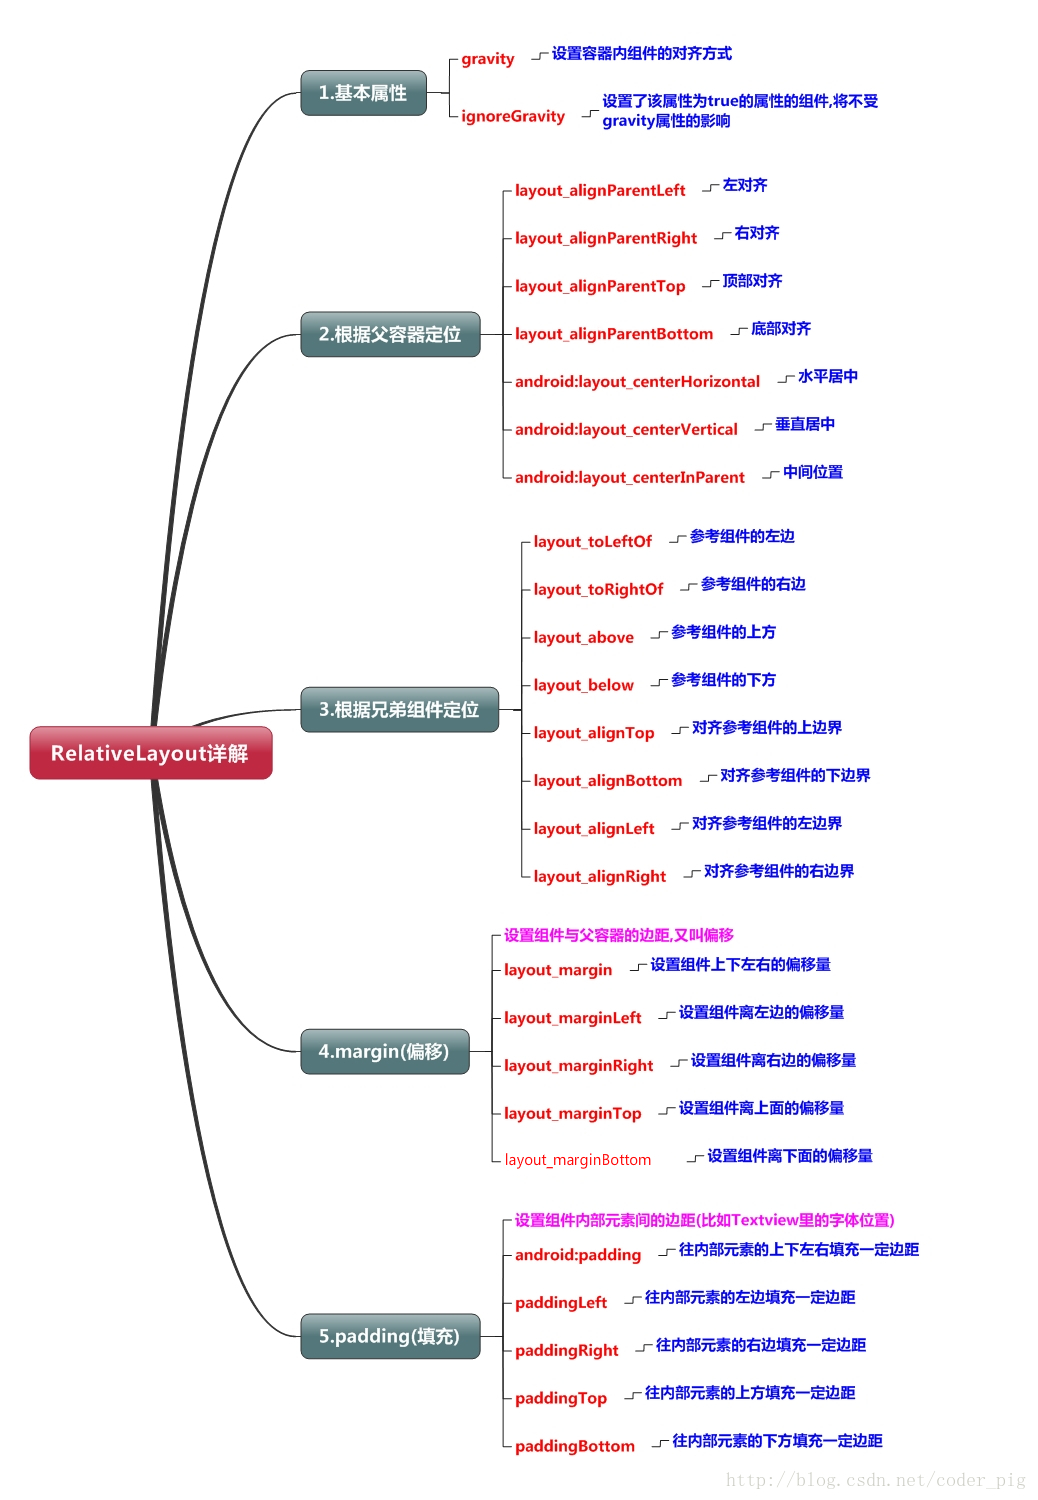
RelativeLayout
RelativeLayout(相对布局)可以相对于彼此或相对于父项描述子项位置布局。
最常用属性
android:layout_toLeftOf:在谁的左边
android:layout_toRightOf:在谁的右边
android:layout_alignBottom:跟谁底部对齐
android:layout_alignParentBottom:跟父空间底部对齐
android:layout_below:在谁的下边
官网示例:
1
2
3
4
5
6
7
8
9
10
11
12
13
14
15
16
17
18
19
20
21
22
23
24
25
26
27
28
29
30
| <RelativeLayout xmlns:android="http://schemas.android.com/apk/res/android"
android:layout_width="match_parent"
android:layout_height="match_parent"
android:paddingLeft="16dp"
android:paddingRight="16dp" >
<EditText
android:id="@+id/name"
android:layout_width="match_parent"
android:layout_height="wrap_content"
android:hint="Reminder name" />
<Spinner
android:id="@+id/dates"
android:layout_width="0dp"
android:layout_height="wrap_content"
android:layout_below="@id/name"
android:layout_alignParentLeft="true"
android:layout_toLeftOf="@+id/times" />
<Spinner
android:id="@id/times"
android:layout_width="96dp"
android:layout_height="wrap_content"
android:layout_below="@id/name"
android:layout_alignParentRight="true" />
<Button
android:layout_width="96dp"
android:layout_height="wrap_content"
android:layout_below="@id/times"
android:layout_alignParentRight="true"
android:text="Done" />
</RelativeLayout>
|

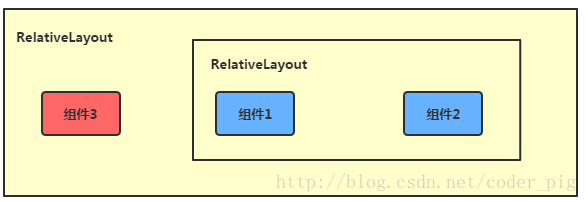
父容器定位属性示意图

示例
1
2
3
4
5
6
7
8
9
10
11
12
13
14
15
16
17
18
19
20
21
22
23
24
25
26
27
28
29
30
31
32
33
34
35
36
37
38
39
| <RelativeLayout xmlns:android="http://schemas.android.com/apk/res/android"
android:layout_width="match_parent"
android:layout_height="match_parent">
<View
android:layout_width="100dp"
android:layout_height="100dp"
android:background="#f0f"
android:layout_alignParentLeft="true"/>
<View
android:layout_width="100dp"
android:layout_height="100dp"
android:background="#ff0"
android:layout_alignParentRight="true"/>
<View
android:layout_width="100dp"
android:layout_height="100dp"
android:background="#ff0"
android:layout_alignParentTop="true"/>
<View
android:layout_width="100dp"
android:layout_height="100dp"
android:background="#00f"
android:layout_alignParentBottom="true"/>
<View
android:layout_width="100dp"
android:layout_height="100dp"
android:background="#00f"
android:layout_centerHorizontal="true"/>
<View
android:layout_width="100dp"
android:layout_height="100dp"
android:background="#00f"
android:layout_centerVertical="true"/>
<View
android:layout_width="100dp"
android:layout_height="100dp"
android:background="#00f"
android:layout_centerInParent="true"/>
</RelativeLayout>
|
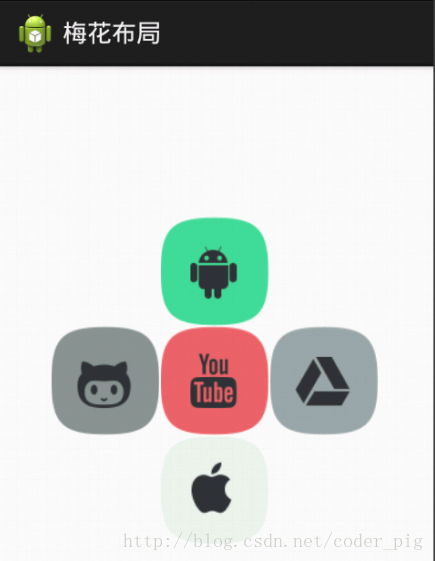
呈现效果:

根据兄弟组件定位
示例:
1
2
3
4
5
6
7
8
9
10
11
12
13
14
15
16
17
18
19
20
21
22
23
24
25
26
27
28
29
30
31
32
33
34
35
36
37
38
39
| <RelativeLayout xmlns:android="http://schemas.android.com/apk/res/android"
android:layout_width="match_parent"
android:layout_height="match_parent">
<View
android:id="@+id/view_1"
android:layout_width="100dp"
android:layout_height="100dp"
android:background="#f0f"
android:layout_centerInParent="true" />
<View
android:layout_width="100dp"
android:layout_height="100dp"
android:background="#ff0"
android:layout_centerInParent="true"
android:layout_toRightOf="@+id/view_1"/>
<View
android:layout_width="100dp"
android:layout_height="100dp"
android:background="#00f"
android:layout_centerInParent="true"
android:layout_toLeftOf="@+id/view_1"/>
<View
android:layout_width="100dp"
android:layout_height="100dp"
android:background="#33a3dc"
android:layout_centerInParent="true"
android:layout_above="@+id/view_1"/>
<View
android:layout_width="100dp"
android:layout_height="100dp"
android:background="#9933CC"
android:layout_centerInParent="true"
android:layout_below="@+id/view_1"/>
</RelativeLayout>
|
P5 TextView
- 文字大小、颜色
- 显示不下使用…
- 文字 + icon
- 中划线、下划线
- 跑马灯
示例:
1
2
3
4
5
6
7
8
9
10
11
12
13
14
15
16
17
18
19
20
21
22
23
24
25
26
27
28
29
30
31
32
33
34
35
36
37
38
39
40
41
42
43
44
45
46
47
48
49
50
51
52
53
54
55
56
57
58
59
60
61
62
63
| <LinearLayout
xmlns:android="http://schemas.android.com/apk/res/android"
android:layout_width="match_parent"
android:layout_height="match_parent"
android:orientation="vertical">
<TextView
android:id="@+id/tv_1"
android:layout_width="wrap_content"
android:layout_height="wrap_content"
android:text="@string/app_name"
android:textColor="#0ff"
android:textSize="28sp"/>
<TextView
android:id="@+id/tv_2"
android:layout_width="100dp"
android:layout_height="wrap_content"
android:ellipsize="end"
android:maxLines="1"
android:text="@string/app_name"
android:textColor="#0ff"
android:textSize="28sp"
android:singleLine="true"/>
<TextView
android:id="@+id/tv_3"
android:layout_width="wrap_content"
android:layout_height="wrap_content"
android:text="@string/app_name"
android:textColor="#0ff"
android:textSize="28sp"
android:drawableRight="@drawable/unfold"
android:drawablePadding="10dp"/>
<TextView
android:id="@+id/tv_4"
android:layout_width="wrap_content"
android:layout_height="wrap_content"
android:text="@string/app_name"
android:textColor="#0ff"
android:textSize="28sp"/>
<TextView
android:id="@+id/tv_5"
android:layout_width="wrap_content"
android:layout_height="wrap_content"
android:text="@string/app_name"
android:textColor="#0ff"
android:textSize="28sp"/>
<TextView
android:id="@+id/tv_6"
android:layout_width="match_parent"
android:layout_height="wrap_content"
android:textSize="18sp"
android:singleLine="true"
android:ellipsize="marquee"
android:marqueeRepeatLimit="marquee_forever"
android:focusable="true"
android:focusableInTouchMode="true"
android:text="你整天说着日了狗日了狗,但是你却没有来,呵呵呵呵呵呵呵呵呵呵~"/>
</LinearLayout>
|
1
2
3
4
5
6
7
8
9
10
11
12
13
14
15
16
17
18
19
20
21
22
23
24
25
| import androidx.appcompat.app.AppCompatActivity;
import android.graphics.Paint;
import android.os.Bundle;
import android.widget.Button;
import android.widget.TextView;
public class MainActivity extends AppCompatActivity {
private TextView mTv4,mTv_5;
private Button mBtnTextView;
@Override
protected void onCreate(Bundle savedInstanceState) {
super.onCreate(savedInstanceState);
setContentView(R.layout.activity_main);
mTv4 = findViewById(R.id.tv_4);
mTv4.getPaint().setFlags(Paint.STRIKE_THRU_TEXT_FLAG);
mTv4.getPaint().setAntiAlias(true);
mTv_5 = findViewById(R.id.tv_5);
mTv_5.getPaint().setFlags(Paint.UNDERLINE_TEXT_FLAG);
}
}
|

Java 我忘得差不多了,也因为时间原因,后续复习完 java 再回来整理。
File/Sync Project with Gradle Files //同步 Gradle 文件
Tools/SDK Manager/Android SDK 建议把 5 以上都勾选上
以上是我对下列视频及文章的归纳和总结。
Android 开发视频教程最新版 Android Studio 开发
相关资料
Android 基础入门教程
应用开发者文档
Android Studio与夜神模拟器的环境搭建&开发调试
Minimum supported Gradle version is 6.1.1. Current version is 5.6.4.√
一招解决gradle依赖库国内下载不了的问题√
Android Studio Error:Connection timed out: connect.√
gradle 下载地址√
解决org.gradle.api.internal.artifacts.ivyservice.DefaultLenientConfiguration$ArtifactResolveException
相关工具
Genymotion:简化 Android 测试